Sigasi CLI runs our powerful code validation from the command line. This means that code validation is now possible without a GUI.
In this article, we demonstrate how you can run Sigasi CLI in a Continuous Integration (CI) environment, namely Jenkins . In a CI setup, code validation with CLI becomes part of regression testing and will help you maintain the quality of your HDL code. In the near future, we’re planning more articles on the CLI and continuous integration, so be sure to check back.
Code validation in Sigasi has a couple of different aspects. On the
one hand, syntax checking verifies that your code is syntactically
correct. Syntax errors are always errors and are flagged as such. On
the other hand, we have code linting, where Sigasi checks for code
that is syntactically correct but is likely incorrect
nonetheless. Examples include a VHDL process with an incomplete
sensitivity list or a case statement which doesn’t cover all cases.
A third, optional aspect of code validation is code style
checking, which checks, among other things, whether names in your
design comply with your team’s naming conventions. For example, some
teams want constant names in all caps or signal names with an s_
prefix. Depending on your settings, linting and code style problems can be flagged as errors,
warnings, or info, or they can be ignored.
For the purposes of this article, we’ve set up a Gitlab project , taken from the Sigasi Studio 4.x VHDL built-in tutorial. As the bare tutorial project is incomplete, it contains a number of problems which Sigasi CLI will flag. Feel free to make your own copy of the project and explore further. Sigasi customers, as always, are welcome to contact support with further questions.
The remainder of this article is organized as follows: First, we briefly discuss the setup of Jenkins itself. Then we show two different ways of setting up a Jenkins project: either as a simple freestyle project, or as a more advanced pipeline project. We also demonstrate how to present the problems found by Sigasi CLI using Jenkins’ warnings-ng plugin.
Jenkins Setup
For our demonstration of how to use Sigasi CLI in Jenkins, we have used an almost out-of-the-box Jenkins setup. We’re using Rocky Linux 8 as an OS. You can use this procedure , starting from step 2, to install Jenkins on it. During the initial Jenkins setup, we installed the recommended plugins, and we’ve kept the default Jenkins executors on the main Jenkins node. In addition to that, we’ve installed the warnings-ng plugin to present the CLI’s results in Jenkins.
Jenkins Freestyle Project
The simple approach to running the CLI in Jenkins uses a freestyle project. It only takes a few simple steps:
- On the Jenkins dashboard, click New Item, enter a name for the new project, select Freestyle project, and click OK.
- On the next screen (Configuration), go to the Source Code
Management section, select Git and enter
https://gitlab.com/sigasi/public/sigasi-cli-ci.gitfor Repository URL. Set the Branch Specifier to*/main. - Continue to Build Steps, add an Execute shell build step and enter these two lines as the command. Replace the license and the install path with the correct ones for your setup.
export SIGASI_LM_LICENSE_FILE=27000@my_license_server
/sigasi_cli_install_path/sigasi-cli verify . --fail-on-error
- Click Save
Now your project is ready to run. Click Build Now to have Jenkins run the CLI on your project. The build will fail because the design contains some errors. Click on the build (under Build History) and then Console Output to inspect the results.
In this case, we have configured the job to fail if Sigasi CLI reports
errors in the HDL code by using --fail-on-error. Depending on your
project’s needs, you can change that using a different command line
argument for the CLI:
--fail-on-errormakes the Jenkins job fail if errors are found in the HDL code--fail-on-warningmakes the Jenkins job fail if errors or warnings are found--fail-on-errormakes the Jenkins job fail if errors, warnings, or infos are reported- without any of the above command line options, the job will fail only if Sigasi CLI was unable to verify the HDL code, e.g. if no license was available.
Reporting Sigasi CLI’s Result with warnings-ng
Checking Sigasi CLI’s results in the job’s console log is not particularly convenient. The good news is that Jenkins has some tricks to make our life easier. The Warnings-NG plugin helps us present the CLI’s result nicely. Once the plugin is installed in Jenkins, our Jenkins project needs some small changes to use it:
- Add command line options such that the CLI produces an XML file for warnings-ng. The shell command now looks as follows:
export SIGASI_LM_LICENSE_FILE=27000@my_license_server
/sigsi_cli_install_path/sigasi-cli verify . --fail-on-error --warnings-ng -o sigasi-warnings.xml
- Configure warnings-ng to pick up Sigasi CLI’s results. Add a Post-build Action: Record compiler warnings and static analysis results, and configure as follows:
- Tool:
Native Analysis Model Format - Fileset ‘includes’:
**/sigasi-warnings.xml - Custom ID:
sigasi - Custom Name:
Sigasi CLI - Open the advanced options and check
Enable recording for failed builds
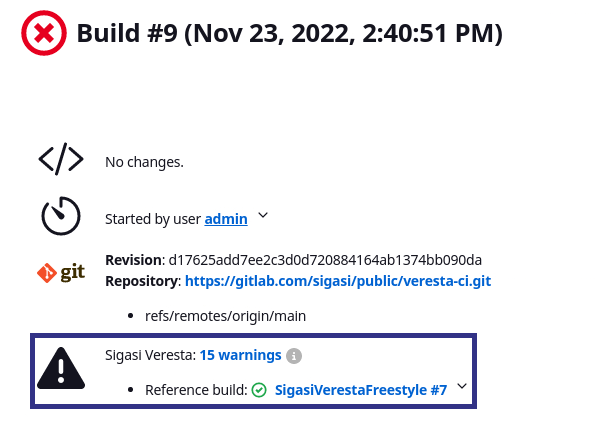
Now run the Jenkins job again. When the job finishes, the build result view in Jenkins contains a warnings-ng section with the number of problems found.

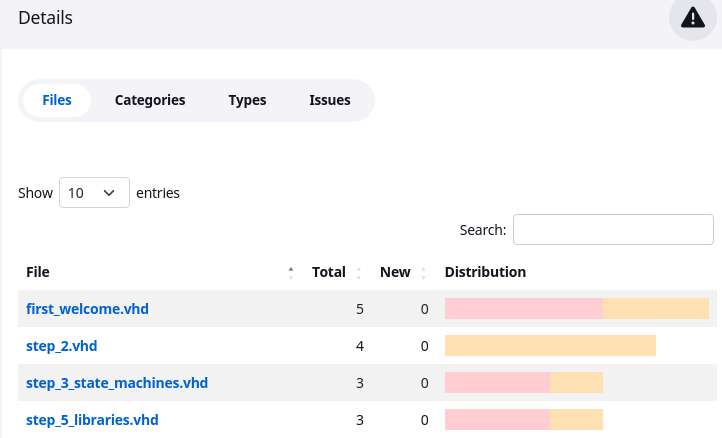
Click on the number of warnings to see more details, e.g. an overview of problems per file…

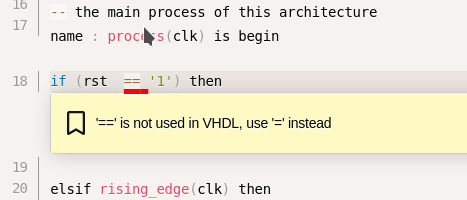
… or details of each problem Sigasi CLI found in the code.

Jenkins Pipeline Project
In this example, we demonstrate how to run Sigasi CLI as a pipeline
step of a Jenkins declarative pipeline. A file named
Jenkinsfile in the GitLab project repository defines the pipeline
steps. Before running the pipeline, you’ll need to set the Sigasi CLI
PATH and license configuration in Jenkinsfile. As you can’t do that
directly in our GitLab project, you’ll need to make your own fork if
you want to try this.
// Set the absolute path of Sigasi CLI
String sigasiCLI = '/path/to/sigasi-cli'

pipeline {
    agent 'any'

    environment {
        // Configure Sigasi CLI license.
        SIGASI_LM_LICENSE_FILE = '27000@my_license_server'
    }
In this case, we only define one stage, in which we run Sigasi CLI code
verification. This stage could become a part of your CI pipeline,
along with regression tests, automatic synthesis, and so on. As in the
previous example, we’ll have Sigasi CLI write its results in an XML file,
which the warnings-ng plugin will use to present them.
Depending on how you want to define a successful or failed Jenkins
job, you can add --fail-on-... flags to Sigasi CLI as discussed
earlier.
    stages {
        stage('Sigasi CLI Verify') {
            steps {
                sh """
                    ${sigasiCLI} verify --warnings-ng -o sigasi-verify.xml .
                """
                // Add `--fail-on-error` , `--fail-on-warning` or `--fail-on-info`
                // on the CLI command line above as required
            }
        }
    }
    post {
        // Report Sigasi CLI errors and warnings to Jenkins' Warnings-NG plugin
        always {
            archiveArtifacts artifacts: 'sigasi-verify.xml'
            recordIssues(
                enabledForFailure: true,
                aggregatingResults: true,
                tool: issues(pattern: 'sigasi-verify.xml', analysisModelId: 'sigasi')
            )
        }
    }
Error/warning reporting with Warnings-NG is defined as a post-processing step in the pipeline. As with the Freestyle job example, the warnings-ng plugin picks up the XML from Sigasi CLI and presents the result in a user-friendly way.
Once the Jenkinsfile is ready and pushed to the repository, it’s time to define the Jenkins pipeline project.
- On the Jenkins dashboard, click New Item, enter a name for the new project, select Pipeline project and click OK.
- On the next screen (Configuration), go to the Pipeline section. Set Definition to Pipeline script from SCM, then select Git as SCM. Enter your repository’s URL for Repository URL. Set the Branch Specifier and Credentials as appropriate. Leave the Script Path as its default value Jenkinsfile.
- Click Save
Now you can run the project, sit back and relax while the job runs, and then check the results.
Conclusion
In this article, we demonstrated two different ways to run Sigasi CLI verification in Jenkins: either in a freestyle project or in a pipeline project. In both cases, we used Jenkins’ warnings-ng plugin to present the CLI’s findings in a user-friendly way.
See also
- Using Sigasi CLI for HDL Code Verification in GitLab CI (knowledge)
- Monitoring HDL code quality with Sigasi CLI and SonarQube (knowledge)
- Using Sigasi CLI as a Git Commit Hook (knowledge)
- Documentation Generation in CI with Sigasi CLI (knowledge)
- Using VUnit in a GitLab CI Verification Environment (blog post)