Introduction
Your work with Sigasi Visual HDL (SVH) is typically organized as a project. A project is a collection of VHDL and/or Verilog/SystemVerilog files that belong together. SVH understands the HDL units defined in the files and the relationships between them.
Your first step is to set up a project. There are several ways to do this. The most common ways are:
Importing a project from the file system
1: Import the project
You can import an existing VHDL or Verilog/SystemVerilog project from the file system by clicking File > Import… > Sigasi > Import a Sigasi project. Browse to the root directory of the project, and press Finish.
2: Set Libraries
Since Sigasi Studio 4.4, SVH automatically configures libraries of imported projects, based on project information
such as library and use clauses. If you need to customize the library configuration, you can assign different
libraries to your files and folders. Right-click on a file or folder and select Library Mapping > New Library….
Then fill out the correct library name.
The following chapter gives more information on using libraries.
3: Add any files that are in other directories
If you need additional files that are not in the project root directory, just drag them from your file browser into the project. You will have the option to create a link rather than copying the files.
Note 1: dragging files works on Windows (using Windows Explorer), and on Linux (using Gnome Nautilus). If you use KDE, you should install Nautilus.
Note 2: to avoid absolute paths in the .project file, environment variables can be used.
Right-click the file or directory in the project explorer and select
Properties > Resource > Location > Edit… to configure the path of the resource.
To access environment variables, you have to prefix the environment variable with ENV-.
For example: to refer to the home directory you can use ENV-HOME.
You can also use project variables. Below you can find all the available project variables that are implicitly defined.
PROJECT_LOC,ECLIPSE_HOME,WORKSPACE_LOC, andPARENT_LOC
SVH also supports PARENT-<COUNT>-<VARIABLE> to refer to folders relatively COUNT above the VARIABLE folder.
Creating a New, Empty Project
To create a new project, select File > New > Sigasi Project. Then give your project a name.
By default, the Use default location checkbox is checked, which means that new projects will be located in the workspace folder. Alternatively, you can uncheck the checkbox and choose an arbitrary location for your project. This is especially useful if you want to use SVH with an existing design.
You can also select the VHDL version or the version of .v files.
After creating a new project, you can add existing files by dragging them from your filesystem into the project explorer. New files can be added by clicking File > New > VHDL File, File > New > Verilog File, or File > New > SystemVerilog File.
Other ways to set up a project
Adding Sigasi support to an existing Eclipse project
You can also add Sigasi support to any project in your workspace by right-clicking the project in the project explorer and selecting Configure > Add Sigasi support.
Importing a Project from an Archive
SVH projects can be shared using file archives. All project-related settings are stored in two hidden files in the project folder. Therefore, you can create an archive of the entire top level folder (File > Export > General > Archive file) and send it to someone else.
You can import a project from an archive by clicking File > Import…> General > Existing Projects into Workspace and selecting Select archive file. Browse to your project archive and press Finish.
Programmatically creating a project
The SVH .project and .library_mapping.xml files can be created using code from our
publicly available Sigasi Project Creator project.
The project offers Python classes that make it easy to generate a Sigasi Project from your own project specifications. For more information and examples, check out the Sigasi Project Creator project on GitHub.
Linked Resources
Linked resources are a convenient way to add files and folders from anywhere, inside or outside of your project, to your Sigasi project at a location of your choice. Linked resources allow you to use existing libraries or IP cores easily. It is not necessary to create symlinks or to copy files.
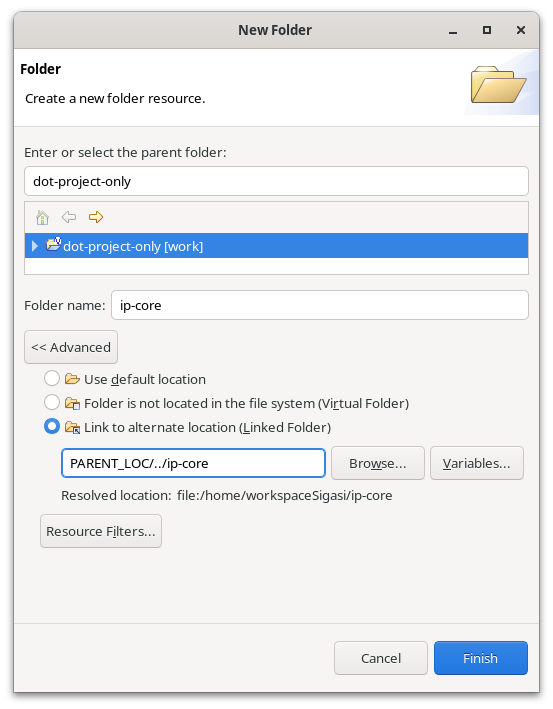
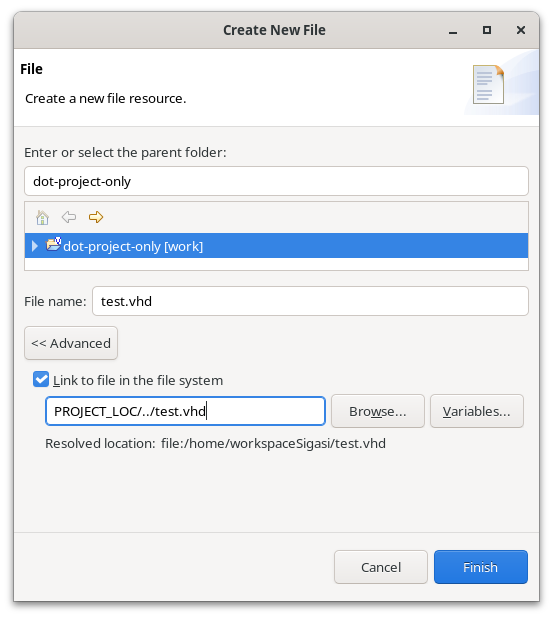
To add a linked resource, you can right-click on the node where you want to add it in the Project Explorer, then click New > File… or New > Folder… and finally, click Advanced » in the dialog that pops up.
For a folder, select Link to alternate location (Linked Folder) and browse to the folder you want to target. For a file select Link to file in the file system and browse to file you want to target. You can also make use of variables when selecting the target.
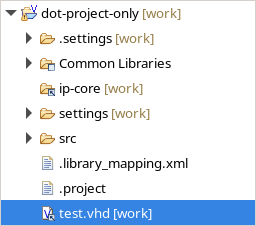
The project now looks as follows.
Deprecated Features
Note that resource filters are discouraged in SVH in Eclipse and unsupported in VS Code and Sigasi CLI.


